
PVC wall panels are a practical and affordable solution for enhancing the look of interior spaces. They are water-resistant, durable, and easy to maintain, making them popular for homes, offices, and commercial spaces. Installing and repairing PVC wall panels is a straightforward process that anyone can complete with the right tools and guidance.
This guide covers everything you need to know about installing and repairing PVC wall panels. Whether updating your walls or fixing damaged panels, these step-by-step instructions will help you achieve professional results.
Tools and Materials Needed
Before starting, gather the necessary tools and materials:
- PVC wall panels
- Measuring tape
- Utility knife or saw
- Adhesive or panel glue
- Screws and anchors
- Drill and screwdriver
- Level
- Sandpaper (for minor repairs)
- Caulking gun and sealant
- Safety gloves and goggles
Step-by-Step Guide to Installing PVC Wall Panels
1. Prepare the Surface
Ensure the wall is clean, dry, and free from dust or grease. If the wall is uneven, consider using a plywood backing to create a smooth surface. Mark the installation area using a pencil and level.
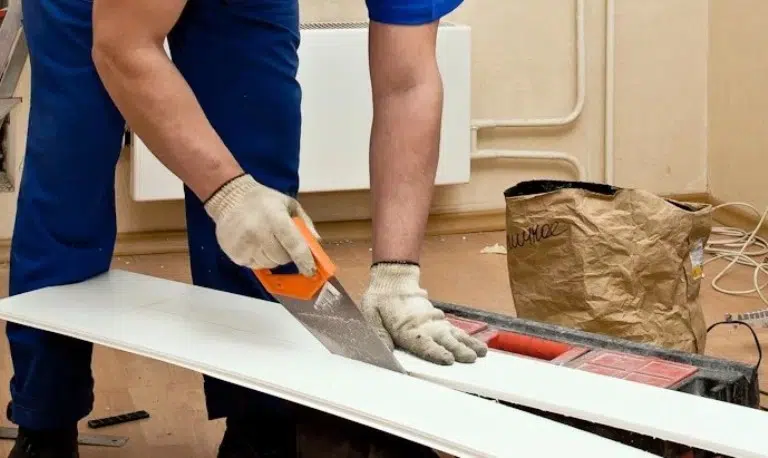
2. Measure and Cut the Panels
Use a measuring tape to determine the panel dimensions required. Mark the cutting lines and use a utility knife or saw to cut the panels accordingly. Double-check measurements before cutting to avoid errors.
3. Apply Adhesive and Attach Panels
Apply adhesive to the back of each panel using a caulking gun. Press the panel onto the wall, starting from one side and working across. Ensure the panels fit tightly together to avoid visible seams.
For additional support, secure panels with screws and anchors. Drill holes into the panel and wall, then insert screws to hold them in place.
4. Seal the Edges
Use a sealant along the edges and seams to prevent moisture from seeping behind the panels. Wipe off excess sealant with a damp cloth before it dries.
5. Finishing Touches
Check for any gaps or uneven areas. Smooth out imperfections with sandpaper if necessary. Clean the installed panels with a damp cloth to remove any dust or adhesive residue.
How to Repair PVC Wall Panels
Over time, PVC panels may get damaged or come loose. Here’s how to fix common issues:
1. Repairing Small Scratches or Cracks
For minor scratches, use sandpaper to smooth out the affected area. Apply a thin layer of sealant or filler to cover cracks. Allow it to dry before sanding lightly and repainting if necessary.
2. Replacing a Damaged Panel
If a panel is severely damaged, it’s best to replace it.
- Remove the damaged panel by carefully prying it away from the wall.
- Clean the area to remove old adhesives or screws.
- Cut a new panel to match the original dimensions.
- Attach the replacement panel using adhesive and screws, following the same installation steps.
- Seal the edges for a seamless finish.
3. Fixing Loose Panels
If a panel becomes loose, reapply the adhesive behind it and press firmly onto the wall. For additional security, use screws to hold the panel in place. Seal the edges with a waterproof sealant.
Additional Tips for Maintaining PVC Wall Panels
- Clean panels regularly with a mild soap solution and a soft cloth.
- Avoid using abrasive cleaners that could scratch the surface.
- Check for any signs of moisture buildup behind panels and address them promptly.
- Inspect panels periodically and fix any loose or damaged sections immediately.
Benefits of PVC Wall Panels
- Water-Resistant: Ideal for bathrooms, kitchens, and basements.
- Easy to Clean: Requires minimal maintenance and can be wiped clean.
- Durable: Resists impact and lasts for years.
- Lightweight: Easy to handle and install.
- Affordable: Cost-effective compared to traditional wall treatments.
Conclusion
Installing and repairing PVC wall panels is a simple DIY project that enhances any space. With the right tools and techniques, you can achieve a professional finish without hiring a contractor. By following this guide, you can confidently install new panels or repair existing ones, ensuring your walls remain in great condition.
FAQs
1. Can PVC wall panels be installed over tiles?
Yes, PVC panels can be installed over tiles as long as the surface is clean and even. The adhesive works well for securing panels to tiled walls.
2. How do I cut PVC wall panels?
You can use a utility knife, handsaw, or circular saw to cut PVC panels. Measure carefully and cut slowly for precise results.
3. Are PVC wall panels fire-resistant?
PVC panels are flame-resistant but not completely fireproof. Keep them away from direct heat sources.
4. Can PVC panels be painted?
Yes, but you need to use a primer designed for PVC before applying paint.
5. How do I remove PVC wall panels without damaging the wall?
Gently pry the panels off using a putty knife or scraper. Use adhesive remover to clean off any leftover glue.

